This question came up when i want to search for older email with attachment in Gmail. I just don’t know where is the toolbar location/icon location to sort email based on attachment in gmail.
In yahoo mail we can find sorting option, which can sort email based on some options such as by data and attachment.
sorting attachment in yahoo
In yahoo this feature is provided and help us to find email more easily. Gmail doesn’t provide this feature, but google provide you search box when you can enter search command. Search command that you must enter to filter email with attachment is
filename:(pdf OR mpg OR mpeg OR avi OR wmv OR rar OR zip OR bmp OR mp3 OR wma OR mov)
for example if you want to search for pdf attachment in your email you can just type in the search box
filename:(pdf)
filter email with attachment in gmail
now you will see the list of email with pdf files attachment 🙂
Cookie is small piece of data added by website to client browser. When user, using the browser want to browse the same website, this website can load stored information from the cookie. This information such as user past activity in that website, any page that has been accessed, user login information, etc.
See google chrome cookie can be done using some ways : 1. Viewing using chrome browser menu
1. Using option icon in chrome (upper-right corner), choose setting
Chrome Setting
2. Show advanced setting in chrome (u can find the link by navigating to the bottom of the page)
Show advanced setting in chrome
3. Choose “content setting” in Privacy section
content setting in google chrome
4. In Cookies part, choose “all cookies and site data”
alt cookies and site data in chrome
5. New window will appear listing all cookies stored in chrome, you can choose to delete it by selecting the cookies and choose remove. However your action is very limited because you can only view and remove the cookie
Cookies and site data in chrome
2. viewing using extension
you can also see google chrome cookie using extension such as Edit This Cookie. It has some feature such as :
delete cookies
add cookies
edit cookies
search cookies
block cookies
protect cookies
export and import cookies in JSON
limit expiration date of any cookies
However this browser extension has option to add ads or behave like an adware. It is said that it is used to support the extension and unicef but, if found out it is not needed you can just opt-out it in extension setting.
Converting video files to mp3 is needed if you want to extract sound from video file. This application i used to extract capture sound from mp4 video files and convert it to mp3 files.
THis can be done easily using Free Video to Mp3 Converter “FreeStudio”. I ve been using this software for converting my video files to mp3
this free video to audio converter also has some output options in different mp3 quality
Free Video to Audio Converter
from the explanation in its website this software can perform many actions such as :
– convert video and audio files between different formats as well as iPod, PSP, iPhone, BlackBerry and all other popular mobile phones and devices;
– burn and rip DVDs and audio CDs;
– upload and download YouTube videos and music to your computer, iPod, PSP, iPhone or BlackBerry;
– perform basic editing of audio and video files;
– record videos and make snapshots;
– create 3D videos and images.
It is really complete software package and its nice to use it because it is free,
Download it Here 🙂
How to see your windows product key?. How to see your windows 7 serial number? Windows product code once installed, this information will be saved by windows in registry, there is no common utilities provided by windows to look or to view this product key or serial number. However if you want to see this windows product key or you want to see your windows serial number. there are many free programs available to download.
one of those program is belarc advisor.
Using this belarc advisor you can get more information that you need. Belarc Advisor will not only provide you your windows (windows 7, vista, xp) product key/serial number. It will also give you any product key from application program that you have installed into your PC.
It gives you more for less expectation, in fact, it will display our computer profile summary, haha its scary actually because it can reveal our sensitive data such as our windows security update status, any used application in some past days, and any media storage that we had plugged in into our computer
This is How Belarc Advisor shows me my windows 7 product key
How to see your windows product key
It may take several minutes for belarc advisor to get all of this data, but it is very informative and very easy to use :).
If you want to see your windows 7 product code / serial code, just Download it here
Installing different version of windows in one computer may be needed to get one advantage that other version dont offer.
Usually the default boot loader version will be windows version that is installed last. This default boot loader however can choose which windows to load when the booting started. however, You can modify it through msconfig.
by using msconfig you can change default boot order in you windows PC
1. click windows logo
2. type “msconfig” in search form
3. in msconfig window choose boot menu
4. click the OS you want to set to be default OS to boot.
Change default boot order in windows using msconfig
Harddisk and Other Input Device Aren’t Detected During Booting. It happened right after i tried to modify bios setting. actually i just want to change the boot order but somehow i slipped, so in order to keep the last setting i choose to activate the optimized default options. but after its restarted it opened the bios setting directly without any button pressed. I also couldn’t find booting priority options.
harddisk, flash usb, and dvd writer were also not detected by my laptop. i tried optimized default menu once again but i still couldn’t make it right. it didn’t show any input device during booting.
after struggling for a while i found the secure boot options
i wasnt sure about this option actually and i hadnt looked for it in internet, but after i disable it
tadaaaaaaaaaaa.
my laptop worked well like before 🙂
so if you somehow have some problem with me, make sure to check for secure boot option in your bios and disable it, it may solve your problem.
it happened some days ago when i tried to use maybe-obsolete windows 7 loader. after the process of installation i found that my laptop couldn’t boot. it looped between the off state and the logo. the solution is actually simple. we can use our installation disk or our windows installation that had been set into other media such as usb flashdisk. make sure you can boot into th flashdisk or your installation media. you can choose the boot priority by modify its setting. just press ‘esc’ while the logo of your laptop manufacturer comes up.
fixing the boot loop can be done using tools provided by windows installation, usually its just loader problem, so once you fix it your laptop will run as usual. choose command prompt and use this following options :
a. bootrec /fixmbr
b. bootrec /fixboot
type or try to run the second option if you can’t get your laptop right using the first one 🙂
There are some cases where our laptop turned off suddenly. It immediately leaves us with black screen, without giving us any confirmation or message. From google i get some tips to avoid getting our laptop turned off like that. Because it is really annoying if we still have a lot of things to do with our laptop or we are in the middle of really busy project and wana make sure it recorded/run well.
Some tips to avoid your laptop turned of suddenly are listed below :
1. Overheat
Overheat can be caused by running very heavy programs that consumes high amount of RAM and Processing. You can check it via task manager, its green indicator bar displays your ram and proccess usage if you see it too high, you can try to reduce it by closing heavy programs or reducing its proccess. Fan problem usually is the reason why your laptop overheat. If your laptop fan is not working well or may be doesn’t work at all, we can make sure that your laptop will be turned off as soon as it is started. You need to fix it in order to get your laptop performance back.
2. Virus
I don’t know but some virus may cause this turned off problem in your laptop. the solution is offcourse too install the antivirus. Smaller and faster antivirus is better than heavy one :). If you don’t find any problem with RAM + Processor and Fan problem you can try to run full scan on your laptop, but don’t run any other program. if it passed, than maybe virus isn’t your problem
3. Fan position
When you are using your laptop you need to make sure that you don’t block your laptop’s fan. The easy way is to make sure you place your laptop in flat place. for example in table or in floor. dont place your laptop in your bed, blanket or other place that may reduce air circulation.
4. Use cooling pad
Using cooling pad can help you avoid your laptop from heating.
5. Use power management application in windows
Windows also provides you power management application. You can utilize it to reduce your proccessor power consumption. By doing this means you restrain you processor work capacity, you reduce your processor performance, so it won’t get overheat. to do this you can go to windows logo and write power options or you can go to control panel and search power options
power options in windows
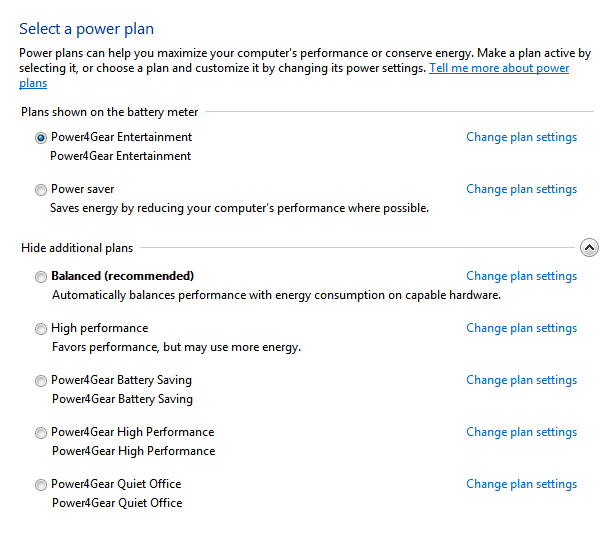
then choose one of the power plan > in the right side choose change plan setting
power options, change plan setting
after that you choose advanced setting
in the windows that appears, choose processor and reduce the amount to amount you need
advanced setting in power options
now u should see that your processor power consumption is restrained and it may help you prevent your laptop from overheat problem
Automatic shutdown on windows can be done in two ways, :
1. via command line
2. via software
Via command line
to run automatic shutdown via command line, first open cmd
then enter shutdown command
[php] shutdown -s -t xxxinsecond [/php]
for example :
[php] shutdown -s -t 7200 [/php]
this will automatically shutdown your computer 2 hours after the command executed.
in case you have running program that need to be closed before you still can force windows to shutdown by adding -f command
shutdown -f -s -t 7200
for windows xp, there will be pop up message showing countdown timer. if you suddenly want to abort this command just run
[php] shutdown -a [/php]
Via software
you can use small size software like vista shutdown timer. you can download it here
the necessity of protecting file or folder sometimes exist because we want to prevent file/folder operation from other user. in linux we can use chattr command
to show how this command works,
1. create new file
# touch newfile
2. add chattr command
# chattr +i newfile
3. try to remove file
# rm newfile
rm: cannot remove `newfile’: Operation not permitted
to remove “immutable” attribute just change option from +i to -i
4. remove attribute
# chattr -i newfile
now u should be able to remove the file.
use man chattr to find other possible options.